Tuesday, July 23, 2013

My Husband is a Beekeeper


My husband claims he doesn't have a sweet tooth. However, he seems to be about as eager as anyone to find ways to get sweets from our land. When we finished up our maple sugaring in the spring Marc quickly turned his attention to a bee hive and maintaining our own supply of honey.

In the beginning of June Marc drove out to western Vermont to pick up a nucleus colony of bees (aka a nuc). The nucleus colony includes a queen and a group of honey bees on 5 frames. You move the colony to your hive by putting their frames into your hive with more empty frames and hope they fill it up and make it their own.

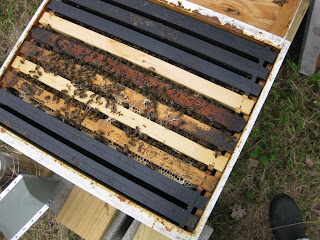
When the bees arrived they were living on wooden frames like this. You can see the perfectly built wax honeycomb on the frame.


Marc put those wooden frames into our empty super along with the empty plastic frames we had. He then placed a bucket full of sugar water on top of the frames so the bees would have some food to start building their wax honeycomb. This meant that while they were getting used to the new area and finding flowers they would have a backup food source. He then used an empty super to cover the sugar water bucket and placed a lid on top.

nucleus colony wooden frames and empty plastic frames to expand into

the lower super has the frames, the top super is just covering the sugar water bucket 

Over the past couple of months the bees have not only filled out all the frames on the bottom super with honeycomb wax, eggs, pollen and honey but we have had to add an additional super on top for them to move into. Marc goes out to the colony at least once a week to check on how they are doing and making sure they are happy. If they run out of room or don't have enough food sources they can swarm and leave your hive. 


And here's a closeup of some of the honeycomb wax they have built full of honey. Marc brought it in because they hadn't built it evenly all over the frame. He also wanted to taste some of the raw honey. It was the most flavorful honey I have ever tasted, even if it was only one or two licks of my fingertip.


I have to admit it's been pretty fascinating learning about bees and beekeeping through Marc's eyes. He's so enthusiastic about them and there is so much I didn't know about how the hive functions. We're hoping to get a little honey from the bees this fall. If we are successful at keeping the bees alive over the winter then next fall we should have enough honey for a real harvest.

Photobucket


Our New Front Door

Remember that time when a conversation about replacing our front door turned into a conversation about jacking up the house an inch or so? Well in case you don't here is how it unfolded . . .


This summer we came up with a list of home improvement projects that we thought we'd be able to tackle from both an experience point of view and a financial one. On that list was replacing the front door. During our home inspection a year ago it was brought to our attention that some of the wood underneath the door was rotten. So prevent that from getting worse and to bring more light into our living room we thought we would replace the old hollow core door with a new steel door that had a larger glass panel in it.


After picking up all our supplies from home depot and reviewing some instructions online we felt adequately prepared for replacing our front door. So with one of Marc's good friends visiting for 4th of July we decided to tackle the door replacement.

But oh, if only it was that simple. You see once we got the front door off we quickly realized that our problem was much worse then just some rotted wood underneath the door. The rot extended through the wood, into the rim joist and the sill plate. When trying to figure out how much of the rim joist needed to be repaired we had to remove some of the wooden shingles from the walls of our house and realized that some of the plywood sheathing on the outside of our house was also rotten. Our project quickly turned from replacing our front door to fixing this hole.


Marc's friend helped with the removal of all the rotten wood and figuring out a plan of attack. But unfortunately he had to return to New York and our weekend project turned into a 5 day project. Thankfully we were able to keep the propped up door "locked" with some plastic utensils.


Our first goal was to replace about 7 feet of the sill plate. In case you don't know what that is it's the piece of wood that sits on top of the foundation and underneath the floor joists. We thought this was going to be the hard part but it actually turned out to be the easier part of the job. Using a sawzall we cut the sill plate into pieces removing the rotten parts from in between the floor joists, but leaving small pieces for the floor joists to rest on. Since those pieces were rotten on the outside we cut them in half which then allowed us to tap the new sill plate in. Once that was halfway in we could remove the remaining pieces of the sill plate. It looked a little like this . . . 


The next part was the tricky part. We thought that we would be able to just slide the new rim joist in with no problem. Unfortunately the placement of our concrete steps combined with the fact that wood isn't very bendy meant that there was no way the rim joist would just slide into place. In order to get it underneath the walls of the house we realized we would have to lift the house a couple of inches to give ourselves clearance. After consulting the internet, youtube, our contractor neighbor and Marc's Uncle Billy who recommended to throw lumber at it we decided to jack up the house. 

Marc built a frame from 2x4s to distribute the lift across the 6 floor joists we needed to lift. We then rested the frame on top of some wall jacks. With help of Marc's cousin Erin and a few twists of the jacks ... our house was lifted enough to slide in the new rim joist. 


It was a little scary to hear the house creaking as we slowly raised the floor but it was reassuring to find the floor level after all was said and done. Plus we no longer had any rot around our front door. The rest of the project involved resheathing the outside of the house with plywood and moisture barrier then replacing the rotten shingles. And finally getting around to the original plan of installing the new door.


The last step of the project was taking the primed front door and painting it blue. Something Marc and I have been looking forward to for a long time. No more faded red (almost pink) door to look at when we come home. Now we have this! 


It's amazing to me how much light now enters our living room with the new door. During the first week 
I kept having to do a double take to make sure we hadn't left the front door open. I also didn't realize how updated the living room would feel with this small change. It's definitely feeling more like our house. 

Photobucket

Monday, July 22, 2013

Lake Champlain

A couple weeks ago we took Violet out to Lake Champlain for the first time. In preparation for her trip we bought a couple of coast guard approved life vests. We found one at Walmart that had a zip up the back, a koala on the front and two straps between the legs. The second one was from LL Bean which had the zip up the front, was neon yellow and had one leg strap. Both are designed to help her float face up in the water. To say she wasn't a fan of them on the boat was an understatement. The meltdown occurred shortly after this photo . . .


Lucky for her she was able to get out of the life vest when we put her down for a nap inside the boat. Obviously she was happy about that!


The best part of the day was when it came time to put Violet in the water. We switched her from the Walmart vest to the LL Bean vest and I handed her over to Marc. While he rested on a life vest he held Violet perpendicular to the water and slowly lowered her into it - watching her reaction the whole time.


Lucky for us she seemed to be enjoying it. The next step was taking her from perpendicular to horizontal in the water and then letting her float.


Violets First Swim from Christina A on Vimeo.

She absolutely loved it! It was an absolutely gorgeous day and the water temp was somewhere in the mid 70s. I would guess that Violet was probably in the water a good 15-20 minutes before we decided it was time to get out. Of course she could only leave the water after the obligatory sunglasses shot with all the swimmers.


Apparently swimming was an exhausting activity and we were left with a tired little girl and a quiet ride home.


Photobucket

Friday, July 12, 2013

Violet - 5 months


Weight - 16 pounds 10 ounces

Dear Violet, 

How has it already been 5 months? It seems like just yesterday I was looking at your wrinkly "old man" feet and smoothing down your crazy hair. Now you have soft potato feet and a head of hair so thin and light in color that it couldn't be more different from the day you were born. At the beginning I struggled seeing further then the current day when I thought about breastfeeding and now I can't imagine a day without it. In fact I'm just not ready to start solid foods with you despite what the doctor says because I cherish our nursing time together. It's hard to believe just how much has changed.

This past month we really feel like you have developed into a little person. It was funny to both of us when we watched you scratch your head. This is going to sound strange but it was such an adult thing to do and looked so grown up that it had us both intrigued. The scratching was due to a little bit of cradle cap but it seems that, just like your baby acne, it was here for only a brief second and is now only a memory.

You are definitely beginning to master some pretty awesome skills. At the beginning of this month you found your feet and boy are you excited about them. Especially since it is something you can put in your mouth and suck on. Finding your feet led to you turning onto your side in your crib and falling asleep that way. One night you realized that if you put your right thumb in your mouth and your left foot in your left hand you could tip all the way over and on June 28th you rolled over for the first time. You were in your crib at that time and started crying so we looked on the video monitor to see that we had missed your milestone. That first night you wanted to continue practicing your new skill but you weren't so happy to sleep on your tummy so after a little fussing Daddy and I would rescue you and flip you over to your back. Thankfully the next night you got comfortable and fell asleep on your tummy with your thumb in your mouth. That's pretty much how you sleep every night now.

You've also started to sit up unassisted for short periods of time. It's pretty fun to watch you look around and play with whatever toy we put in front of you. In fact you are even passing toys from one hand to the other. Some of your bigger toys you have to grasp with both hands and you better believe you are good at taking whatever you grab hold of straight to your mouth. You love to reach for whatever Daddy is eating or drinking, even if it is a beer. If we're not careful you're also quick to grab Daddy's glasses or Mommy's hair. One of your more tender moments is when you reach up and place your hand against our cheeks or rest it on our nose.

Speaking of your mouth you are a pro at blowing raspberries and making fart noises. It makes me laugh out loud to watch you purse your lips, pull your chin to your chest, and blow so hard that your face turns pink. You've also started to have more giggle sessions. In fact on our recent trip to Costco you spent a few good minutes giggling with your Aunt Erin which allowed me to record it for the first time.

One of your favorite toys right now is the cloth spider that hangs from your car seat handle. Just when we think you are asleep we hear you pull it towards you and listen as it vibrates back up it's string. You also really like the silicone teething rings we received as a gift. They are a great way to keep your hands busy and distract you from rolling over while we are trying to get your diaper changed. You still enjoy spending time in your exersaucer - pulling the toys off, turning around, and sometimes even just pushing on your legs and trying to jump. My favorite is when I catch you at the right time of the day to sit with you and read you a whole book. Sometimes you even reach for the pages.

Next time we write an update you will have reached a half a year. Will any teeth have shown up? Will you know how to roll from tummy to back? I guess only time will tell. 

Love, 
Your Mom and Dad 

Wednesday, July 3, 2013

One Year Later - Part 2

While the bedrooms and one of the bathrooms feel pretty complete the following three rooms still feel like they are in progress. One of my favorite projects this year was opening up the wall between the living room and kitchen. This summer we plan to lay some wood floors down in these three rooms, replace our front door and finish the mini-renovation that we started in the kitchen. When that is all finished I will feel like the main floor of our house will be pretty much done and we can start thinking about the basement and garage. 


Living Room  
click on photo to enlarge
  • Removed carpet 
  • Painted wall 
  • Opened up wall between living room and kitchen 


Kitchen
click on photo to enlarge
  • Removed carpet 
  • Relocated refrigerator 
  • Started kitchen mini-renovation (painted cabinets, added knobs, painted wall green, painted laminate counter grey)
  • Prepped ceiling for painting 
  • Replaced golden florescent tube light 


Dining Room
click on photo to enlarge
  • Painted walls 
  • Prepped ceiling for painting 


Photobucket

Tuesday, July 2, 2013

One Year Later

Today is the one year anniversary of Marc and I owning our first home - the place we affectionately call the homestead. It's really hard to believe that it's only been a year, since so much has happened over the past year both to the house and in the house. At the time we closed we already knew that there was a baby on the way and we had big ideas about how we could turn the house into our own. But I don't think we could have guessed just how much we would be able to accomplish in our first year.

Here's a look at where we started and where we are now . . .


Master Bedroom
click on photo to enlarge


Guest Bathroom 
click on photo to enlarge
  • Completely gutted the bathroom except for the built in shelves and hired a handyman to put it back together
  • Painted the walls, ceiling and built in shelves
  • Replaced the heater cover 
  • Installed a double towel rail 
  • Added privacy film to the window 

Guest Bedroom 
click on photo to enlarge

  • Removed painted wallpaper
  • Removed carpet and had new carpet installed 
  • Painted the walls, inside of the closet, trim, and heater cover 
  • Replaced the door
  • Replaced the closet light 
  • Hung curtain rod and curtains


Nursery
click on photo to enlarge

  • Removed the wallpaper
  • Removed the carpet and had new carpet installed
  • Replaced bi-fold closet doors with curtains
  • Hung curtain rod and curtains 
  • Made and installed a roman shade on small window 
  • Painted the walls, inside of the closet, trim and heater cover 
  • Replaced the door 
  • Updated the electrical outlets to tamper resistant

Throughout the year we've tried to do as much of the work as we could ourselves. However, I have to admit that we have also had the generous help of our friends and family. When we were running out of steam we had them to count on to keep the momentum going and for that we'll be forever grateful. Tomorrow I'll post updates on the living room, kitchen and dining room.


Photobucket